A potato battery is a simple and fun science experiment that demonstrates how electricity can be generated using everyday materials. It is a great way to introduce kids to the concept of electricity and how it can be harnessed from natural sources.
To make a potato battery, you will need a few basic materials:
- Potatoes (one or more, depending on the size of your project)
- Copper and zinc nails (or pennies and galvanized nails)
- Wires
- A small light bulb or digital clock (optional)
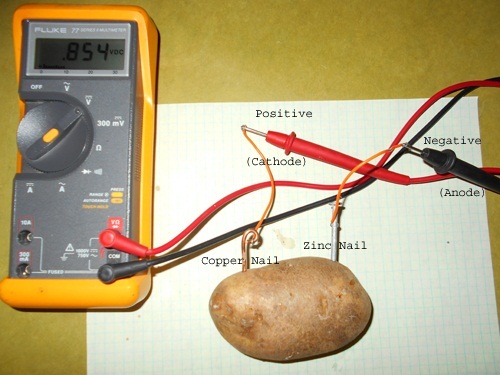
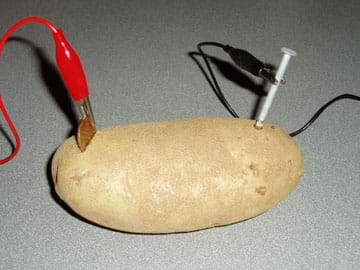
To begin, start by poking a copper nail and a zinc nail into a potato. Make sure the nails are not touching. Then, connect one end of a wire to the copper nail and the other end to the positive terminal of your light bulb or clock. Next, connect a wire to the zinc nail and the other end to the negative terminal of your light bulb or clock.
As the potato decomposes, it releases electrons, which flow from the zinc nail to the copper nail, generating an electrical current. This current is not strong enough to power most devices, but it is enough to light up a small light bulb or run a digital clock for a short period of time.
One of the benefits of using a potato battery is that it is a renewable source of energy. As long as you have potatoes and metal nails, you can create an endless supply of electricity. It is also a cheap and easy way to learn about electricity and how it works.
Potato batteries can be used to power small electronics, such as LED lights or digital clocks, but they are not a practical source of energy for larger devices. However, they are a great educational tool and can help students understand the basics of electricity and how it can be generated from natural sources.
Overall, potato batteries are a fun and easy way to learn about electricity and how it can be harnessed from everyday materials. They are a great educational tool for kids and can help them understand the basics of electricity and how it works.
Potato Battery Experiment

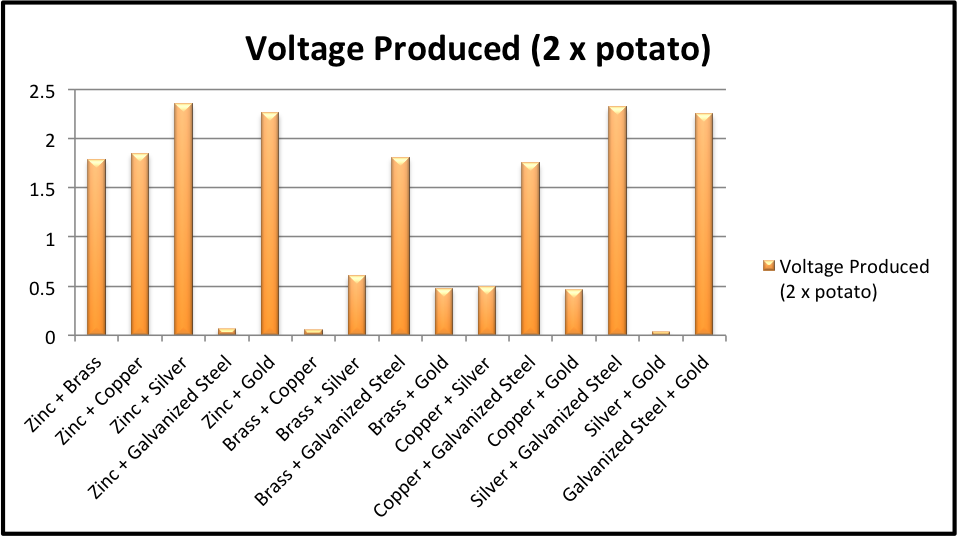
These ionic solutions The best food battery is any fruit or vegetable that has high levels of superconductive ions, such as potassium or sodium, and the proper internal structure to create a working current. This means that it separates the zinc and copper, forcing the electrons trying to get from one metal to the other to travel through the potato and form a circuit. How exactly do the voltage and current change when your batteries potatoes are configured in series or in parallel? If this is the case, simply switch the clips on the voltmeter leads and it should change to a positive voltage. We need two dissimilar metals as the battery terminals, and they must be inserted into the potato for the battery to work. The electromotive force diminishes and the battery stops working. Figure 1 shows diagrams of open, closed, and short circuits. Hence, it is a very simple yet efficient and cheap process for the production of electricity.
How to Turn a Potato Into a Battery

In contrast, tomatoes have unorganized, messy insides and often leak, and even an orange — which Fruit and metal Some fruits and vegetables may be chock-full of superconductive ions, but you'll need a few more materials to turn these foods into batteries. Now to make it follow the steps given below: Step-1: Strip one end of a wire. It's not as smart as you are, and it may occasionally give humorous, ridiculous, or even annoying results! When the two wires are attached to the bulb it completes this circuit, turning the light on! Then, move to a smaller scale if possible to improve measurement accuracy. Do certain combinations work and others not? Also, try using more potatoes i. All of them are appropriate for any age. Grade 4 Do you agree with this alignment? Simply pull the nail back so it is no longer sticking out.
Potato Battery: Learn Definition, Steps to make, Results here!

Wrap one end of the third strip of wire you have just cut around the zinc nail in first potato and the opposite end around the copper nail in the second potato. If so, can you make different combinations, like two batteries in parallel combined with a third battery in series, and test your formulas on these more-complicated scenarios? Major steps are listed, but please refer to the Project Day Split the class into smaller groups as materials allow. The solution is typically an acid. Your led light should light up now. On the other hand, if you bathe the two strips in a conductive solution, and connect them externally with a wire, the reactions between the electrodes and the solution continually furnish the circuit with charges. For example, when table salt is dissolved in water, the sodium and chloride — which have opposite charges, as Na+ and Cl- — create an ionic solution, Hickner said.